“ 悄悄咪咪告诉你,DataBinding是怎么实现双向绑定的“
在讲DataBinding之前,有必要讲讲ViewBinding
ViewBinding
配置
要使用ViewBinding,只需要在gradle 添加如下配置即可
android {
        ...
        viewBinding {
            enabled = true
        }
 }
如果需要在生成绑定类时忽略某个布局文件,请将 tools:viewBindingIgnore=”true” 属性添加到相应布局文件的根视图中:
<LinearLayout
        ...
            tools:viewBindingIgnore="true" >
        ...
</LinearLayout>
用法
在创建xml文件后,Android Studio会自动创建对应的类,类名格式为:XML 文件的名称转换为驼峰式大小写,并在末尾添加Binding一词。
比如,创建了一个activity_view.xml
<LinearLayout
           ...>
    <TextView
        android:id="@+id/viewBindingView"
        android:layout_width="match_parent"
        android:layout_height="20dp" />
</LinearLayout>
生成的绑定类就叫做ActivityViewBinding,然后在对应的activity中使用布局绑定
public class ViewBindingActivity extends AppCompatActivity {
    private ActivityViewBinding activityViewBinding;

    @Override
    protected void onCreate(@Nullable Bundle savedInstanceState) {
        super.onCreate(savedInstanceState);
        // 初始化布局和view
        activityViewBinding = ActivityViewBinding.inflate(getLayoutInflater());
        // 设置contentView
        setContentView(activityViewBinding.getRoot());
        // 获取到id为viewBindingView的textView,并设置文本
        activityViewBinding.viewBindingView.setText("你好,我是viewBinding");
    }
}
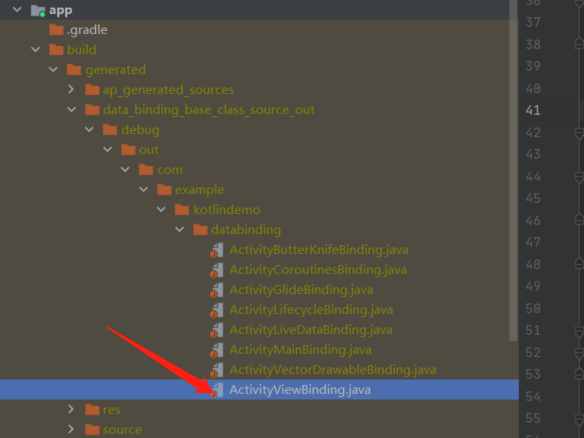
原理
在build之后,会在如下路径生成对应的类
生成如下代码
public final class ActivityViewBinding implements ViewBinding {
    @NonNull
    private final LinearLayout rootView;
    // 通过遍历xml,找到声明id了的view,id作为变量名
    @NonNull
    public final TextView viewBindingView;

    private ActivityViewBinding(@NonNull LinearLayout rootView, @NonNull TextView viewBindingView) {
        this.rootView = rootView;
        this.viewBindingView = viewBindingView;
    }

    @Override
    @NonNull
    public LinearLayout getRoot() {
        return rootView;
    }

    // 传入LayoutInflater,用于获取对应布局的view
    @NonNull
    public static ActivityViewBinding inflate(@NonNull LayoutInflater inflater) {
        return inflate(inflater, null, false);
    }

    @NonNull
    public static ActivityViewBinding inflate(@NonNull LayoutInflater inflater,
                                              @Nullable ViewGroup parent, boolean attachToParent) {
        // 通过指定的布局获取到rootView
        View root = inflater.inflate(R.layout.activity_view, parent, false);
        if (attachToParent) {
            parent.addView(root);
        }
        return bind(root);
    }
    // 核心代码,通过代码模板,找到对应的view
    @NonNull
    public static ActivityViewBinding bind(@NonNull View rootView) {
        int id;
        missingId:
        {
            id = R.id.viewBindingView;
            TextView viewBindingView = rootView.findViewById(id);
            if (viewBindingView == null) {
                break missingId;
            }
            return new ActivityViewBinding((LinearLayout) rootView, viewBindingView);
        }
        String missingId = rootView.getResources().getResourceName(id);
        throw new NullPointerException("Missing required view with ID: ".concat(missingId));
    }
}
生成的类通过LayoutInflater获取布局,然后依次初始化view。
DataBinding
配置
DataBinding 跟ViewBinding一样,只需要在gradle中添加如下配置即可
android {
        ...
        dataBinding {
            enabled = true
        }
    }
用法
我们先看activity_main.xml布局:
<?xml version="1.0" encoding="utf-8"?>
<layout xmlns:android="http://schemas.android.com/apk/res/android">
    <data>
        <variable
            name="video"
            type="com.example.databinding.VideoBean" />
    </data>
    <LinearLayout xmlns:tools="http://schemas.android.com/tools"
        android:layout_width="match_parent"
        android:layout_height="match_parent"
        android:orientation="vertical"
        tools:context=".MainActivity">

        <TextView
            android:id="@+id/bind_text1"
            android:layout_width="match_parent"
            android:layout_height="30dp"
            android:gravity="center"
            android:text="@{video.title}" />

        <Button
            android:id="@+id/bind_text2"
            android:layout_width="match_parent"
            android:layout_height="50dp"
            android:text="@{String.valueOf(video.score + 1)}" />

    </LinearLayout>
</layout>
与正常的xml布局不一样的是,DataBinding 以layout作为第一层。第二层分别是 data和view的根布局。
其中data下的name作为对象,type为类路径名
package com.example.databinding;
public class VideoBean {
    public String title;
    public int score;
    public VideoBean(String title, int score) {
        this.title = title;
        this.score = score;
    }
}
然后在布局中就可以把对象的属性值显示到TextView上
<TextView
     ...
     android:text="@{video.title}" />
在对应的activity中,使用的方式与ViewBinding类似
public class MainActivity extends AppCompatActivity {
private ActivityMainBinding mainBinding;
private VideoBean video;
@Override
protected void onCreate(@Nullable Bundle savedInstanceState) {
super.onCreate(savedInstanceState);
// 获取对应的binding类
mainBinding = ActivityMainBinding.inflate(getLayoutInflater());
setContentView(mainBinding.getRoot());
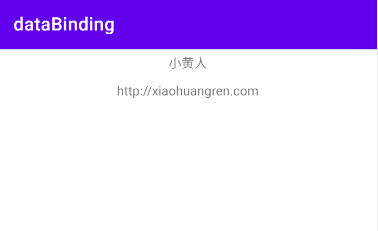
video = new VideoBean("小黄人", 8);
// 设置对应的数据
mainBinding.setVideo(video);
// 设置周期监听,可选
mainBinding.setLifecycleOwner(this);
}
}
全程我们没有初始化对应的view,只是获取bean,然后更新一下即可
当然,我们也可以在布局中添加对应的事件响应
      <Button
            android:id="@+id/bind_text2"
            android:layout_width="match_parent"
            android:layout_height="50dp"
            android:onClick="@{video::increaseScore}"
            android:text="@{String.valueOf(video.score + 1)}" />
在类中添加 increaseScore方法,如下所示,即可实现点击button修改score的值,并更新ui。
public class VideoBean extends BaseObservable {
    public String title;
    // 声明该属性是可绑定监听的
    @Bindable
    public int score;
    public VideoBean(String title, int score) {
        this.title = title;
        this.score = score;
    }

    public void increaseScore(View view) {
        score++;
        // 通知score属性变化了
        notifyPropertyChanged(BR.score);
    }
}
我们只需要修改少量代码即可实现双向绑定,接下来将会讲解对应的原理。
更多见布局和绑定表达式
原理
view的初始化
生成的类路径与ViewBinding一样,直接看看对应的类
// 抽象类
public abstract class ActivityMainBinding extends ViewDataBinding {
  @NonNull
  public final Button bindText2;
  @Bindable
  protected VideoBean mVideo;
  protected ActivityMainBinding(Object _bindingComponent, View _root, int _localFieldCount,
                                TextView bindText1, Button bindText2) {
    super(_bindingComponent, _root, _localFieldCount);
    this.bindText1 = bindText1;
    this.bindText2 = bindText2;
  }

  // 把布局文件中,<data> 下的参数都声明了get/set方法
  public abstract void setVideo(@Nullable VideoBean video);

  @Nullable
  public VideoBean getVideo() {
    return mVideo;
  }

  @NonNull
  public static ActivityMainBinding inflate(@NonNull LayoutInflater inflater) {
    return inflate(inflater, DataBindingUtil.getDefaultComponent());
  }

  @NonNull
  @Deprecated
  public static ActivityMainBinding inflate(@NonNull LayoutInflater inflater,
                                            @Nullable Object component) {
    return ViewDataBinding.<ActivityMainBinding>inflateInternal(inflater, R.layout.activity_main, null, false, component);
  }
  ...
}
这里的ActivityMainBinding 继承了ViewDataBinding,但是内部却没有类似ViewBinding那样,直接通过findViewById方式初始化我们需要的view,那这些view是怎么来的?
这个问题我们先放一放,上面的inflate方法调用了ViewDataBinding的inflateInternal 方法
public abstract class ViewDataBinding extends BaseObservable implements ViewBinding {
    ...
    protected static <T extends ViewDataBinding> T inflateInternal(
            @NonNull LayoutInflater inflater, int layoutId, @Nullable ViewGroup parent,
            boolean attachToParent, @Nullable Object bindingComponent) {
        return DataBindingUtil.inflate(
                inflater,
                layoutId,
                parent,
                attachToParent,
                checkAndCastToBindingComponent(bindingComponent)
        );
    }
}
来到DataBindingUtil 这个工具类
public class DataBindingUtil {
   private static DataBinderMapper sMapper = new DataBinderMapperImpl();

   public static <T extends ViewDataBinding> T inflate(
            @NonNull LayoutInflater inflater, int layoutId, @Nullable ViewGroup parent,
            boolean attachToParent, @Nullable DataBindingComponent bindingComponent) {
        final boolean useChildren = parent != null && attachToParent;
        final int startChildren = useChildren ? parent.getChildCount() : 0;
        final View view = inflater.inflate(layoutId, parent, attachToParent);
        if (useChildren) {
            return bindToAddedViews(bindingComponent, parent, startChildren, layoutId);
        } else {
            // activity里面传的parent为null ,所以会走这里
            return bind(bindingComponent, view, layoutId);
        }
    }
    static <T extends ViewDataBinding> T bind(DataBindingComponent bindingComponent, View root,
            int layoutId) {
        return (T) sMapper.getDataBinder(bindingComponent, root, layoutId);
    }

}
DataBinderMapperImpl 的实现如下
package androidx.databinding;

public class DataBinderMapperImpl extends MergedDataBinderMapper {
  DataBinderMapperImpl() {
    // 将impl添加到mMappers中
    addMapper(new com.example.databinding.DataBinderMapperImpl());
  }
}
// 对应的基类
public class MergedDataBinderMapper extends DataBinderMapper {
    ....
    @Override
    public ViewDataBinding getDataBinder(DataBindingComponent bindingComponent, View view,
            int layoutId) {
        // 遍历 mMappers
        for(DataBinderMapper mapper : mMappers) {
            ViewDataBinding result = mapper.getDataBinder(bindingComponent, view, layoutId);
            if (result != null) {
                return result;
            }
        }
        if (loadFeatures()) {
            return getDataBinder(bindingComponent, view, layoutId);
        }
        return null;
    }
}
那就看看com.example.databinding.DataBinderMapperImpl 的实现
public class DataBinderMapperImpl extends DataBinderMapper {
private static final int LAYOUT_ACTIVITYMAIN = 1;
private static final SparseIntArray INTERNAL_LAYOUT_ID_LOOKUP = new SparseIntArray(1);
static {
// 保存我们创建的layout与 index的映射
INTERNAL_LAYOUT_ID_LOOKUP.put(com.example.databinding.R.layout.activity_main, LAYOUT_ACTIVITYMAIN);
}
@Override
public ViewDataBinding getDataBinder(DataBindingComponent component, View view, int layoutId) {
// 通过layoutId,获取到index,上面传的是R.layout.activity_main,
// 所以这里localizedLayoutId为LAYOUT_ACTIVITYMAIN
int localizedLayoutId = INTERNAL_LAYOUT_ID_LOOKUP.get(layoutId);
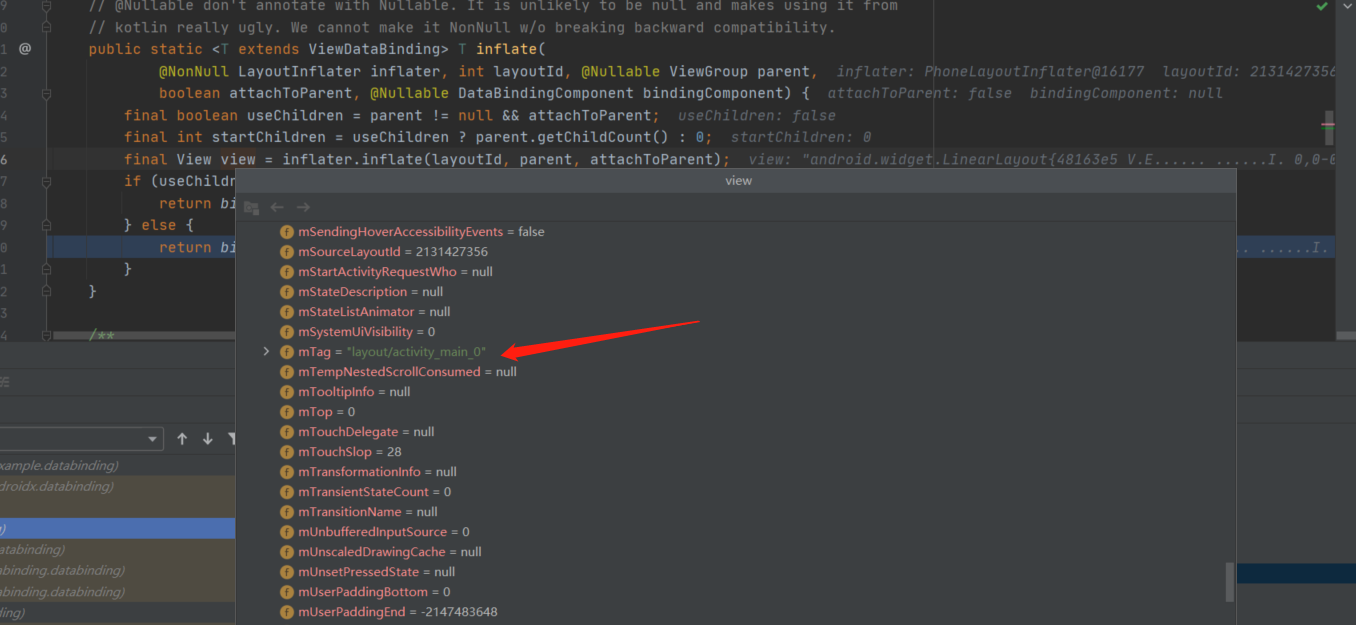
if(localizedLayoutId > 0) {
// 获取到TAG,上面的代码没有设置tag的地方,但是通过debug得知对应的tag为"layout/activity_main_0"
final Object tag = view.getTag();
if(tag == null) {
throw new RuntimeException("view must have a tag");
}
switch(localizedLayoutId) {
case LAYOUT_ACTIVITYMAIN: {
if ("layout/activity_main_0".equals(tag)) {
return new ActivityMainBindingImpl(component, view);
}
throw new IllegalArgumentException("The tag for activity_main is invalid. Received: " + tag);
}
}
}
return null;
}
...
}
至于view的tag是怎么来的,笔者猜测是Android Studio自动添加的
最终我们获取到了ActivityMainBindingImpl的实例,对应实现如下
public class ActivityMainBindingImpl extends ActivityMainBinding  {
    @Nullable
    private static final androidx.databinding.ViewDataBinding.IncludedLayouts sIncludes;
    @Nullable
    private static final android.util.SparseIntArray sViewsWithIds;
    static {
        sIncludes = null;
        sViewsWithIds = null;
    }
    // views
    @NonNull
    private final android.widget.LinearLayout mboundView0;
    // listeners
    private OnClickListenerImpl mVideoIncreaseScoreAndroidViewViewOnClickListener;
    // Inverse Binding Event Handlers

    public ActivityMainBindingImpl(@Nullable androidx.databinding.DataBindingComponent bindingComponent, @NonNull View root) {
        // 重点!!!!, 这里通过mapBindings方法初始化view的数组
        this(bindingComponent, root, mapBindings(bindingComponent, root, 3, sIncludes, sViewsWithIds));
    }
    private ActivityMainBindingImpl(androidx.databinding.DataBindingComponent bindingComponent, View root, Object[] bindings) {
        // 调用super即ActivityMainBinding的构造函数,给ActivityMainBinding的view成员变量赋值
        super(bindingComponent, root, 0
            , (android.widget.TextView) bindings[1]
            , (android.widget.Button) bindings[2]
            );
        this.bindText1.setTag(null);
        this.bindText2.setTag(null);
        this.mboundView0 = (android.widget.LinearLayout) bindings[0];
        this.mboundView0.setTag(null);
        setRootTag(root);
        invalidateAll();
    }
    ...
    public void setVideo(@Nullable com.example.databinding.VideoBean Video) {
        this.mVideo = Video;
        synchronized(this) {
            mDirtyFlags |= 0x1L;
        }
        notifyPropertyChanged(BR.video);
        // 请求重新刷新
        super.requestRebind();
    }

    // 主要处理UI的刷新和事件的设置
    @Override
    protected void executeBindings() {
        long dirtyFlags = 0;
        synchronized(this) {
            dirtyFlags = mDirtyFlags;
            mDirtyFlags = 0;
        }
        java.lang.String stringValueOfVideoScoreInt1 = null;
        int videoScoreInt1 = 0;
        android.view.View.OnClickListener videoIncreaseScoreAndroidViewViewOnClickListener = null;
        java.lang.String videoTitle = null;
        int videoScore = 0;
        com.example.databinding.VideoBean video = mVideo;

        if ((dirtyFlags & 0x3L) != 0) {
                if (video != null) {
                    // 初始化点击事件
                    videoIncreaseScoreAndroidViewViewOnClickListener = (((mVideoIncreaseScoreAndroidViewViewOnClickListener == null) ? (mVideoIncreaseScoreAndroidViewViewOnClickListener = new OnClickListenerImpl()) : mVideoIncreaseScoreAndroidViewViewOnClickListener).setValue(video));
                    // 给变量赋值
                    videoTitle = video.title;
                    // 给变量赋值
                    videoScore = video.score;
                }
                ....
        }
        if ((dirtyFlags & 0x3L) != 0) {
            // 给TextView设置text,其实就是调用TextView的setText方法
            androidx.databinding.adapters.TextViewBindingAdapter.setText(this.bindText1, videoTitle);
            // 设置监听
            this.bindText2.setOnClickListener(videoIncreaseScoreAndroidViewViewOnClickListener);
            androidx.databinding.adapters.TextViewBindingAdapter.setText(this.bindText2, stringValueOfVideoScoreInt1);
        }
    }
    // 点击事件的回调
    public static class OnClickListenerImpl implements android.view.View.OnClickListener{
        private com.example.databinding.VideoBean value;
        public OnClickListenerImpl setValue(com.example.databinding.VideoBean value) {
            this.value = value;
            return value == null ? null : this;
        }
        @Override
        public void onClick(android.view.View arg0) {
            // 调用我们设置的方法
            this.value.increaseScore(arg0);
        }
    }
    ...
}
初始化view的核心:ActivityMainBindingImpl 在构造函数中,通过mapBindings函数初始化我们需要的view
public abstract class ViewDataBinding extends BaseObservable implements ViewBinding {
      public static final String BINDING_TAG_PREFIX = "binding_";
      ....
      // 参数 bindingComponent:与此绑定一起使用的绑定组件。
      // 参数 root:即xml对应的根view
      // 参数 numBindings: 要绑定的view数
      // 参数 includes:包含布局信息,由它们的容器索引索引。
      // 参数 viewsWithIds:没有标签但有 ID 的视图索引。
      protected static Object[] mapBindings(DataBindingComponent bindingComponent, View root,
          int numBindings, IncludedLayouts includes, SparseIntArray viewsWithIds) {
          Object[] bindings = new Object[numBindings];
          mapBindings(bindingComponent, root, bindings, includes, viewsWithIds, true);
          return bindings;
      }

      private static void mapBindings(DataBindingComponent bindingComponent, View view,
            Object[] bindings, IncludedLayouts includes, SparseIntArray viewsWithIds,
            boolean isRoot) {
        final int indexInIncludes;
        final ViewDataBinding existingBinding = getBinding(view);
        if (existingBinding != null) {
            return;
        }
        Object objTag = view.getTag();
        final String tag = (objTag instanceof String) ? (String) objTag : null;
        boolean isBound = false;
        if (isRoot && tag != null && tag.startsWith("layout")) {
            // view的tag是layout开头,则表示为根布局
            final int underscoreIndex = tag.lastIndexOf('_');
            if (underscoreIndex > 0 && isNumeric(tag, underscoreIndex + 1)) {
                // 解析tag中末尾的下标,这里的tag是 layout/activity_main_0
                final int index = parseTagInt(tag, underscoreIndex + 1);
                // 解析出的index为0,即给0下标赋值为rootView
                if (bindings[index] == null) {
                    bindings[index] = view;
                }
                indexInIncludes = includes == null ? -1 : index;
                isBound = true;
            } else {
                indexInIncludes = -1;
            }
        } else if (tag != null && tag.startsWith(BINDING_TAG_PREFIX)) {
            // child view的tag为"binding_1"、"binding_2"....
            // 通过tag最后的数字,确定view在数组中的下标
            int tagIndex = parseTagInt(tag, BINDING_NUMBER_START);
            if (bindings[tagIndex] == null) {
                bindings[tagIndex] = view;
            }
            isBound = true;
            indexInIncludes = includes == null ? -1 : tagIndex;
        } ....
        if (view instanceof  ViewGroup) {
            // 如果当前是viewGroup,那就遍历所有的child。
            final ViewGroup viewGroup = (ViewGroup) view;
            final int count = viewGroup.getChildCount();
            int minInclude = 0;
            for (int i = 0; i < count; i++) {
                final View child = viewGroup.getChildAt(i);
                boolean isInclude = false;
                ....
                if (!isInclude) {
                    // 递归调用
                    mapBindings(bindingComponent, child, bindings, includes, viewsWithIds, false);
                }
            }
        }
    }
}
小结起来就是:
获取view的tag来区分layout和要绑定的view,再通过tag最后的数字来确定view在view数组的下标,通过遍历child,来获取view对象。
可以看到,dataBinding在初始化view的时候,相对来说比viewBinding要费事一些,它需要不断的递归遍历所有的view。
刷新UI
当我们调用setVideo方法设置bean对象的时候,它是如何显示值的呢?
回到ActivityMainBinding,它的setVideo方法实现如下:
    public void setVideo(@Nullable com.example.databinding.VideoBean Video) {
        this.mVideo = Video;
        synchronized(this) {
            mDirtyFlags |= 0x1L;
        }
        notifyPropertyChanged(BR.video);
        // 请求重新刷新
        super.requestRebind();
    }
我们看看 super.requestRebind() 做了啥?
public abstract class ViewDataBinding extends BaseObservable implements ViewBinding {
   private static final boolean USE_CHOREOGRAPHER = SDK_INT >= 16;
   ....
   protected ViewDataBinding(DataBindingComponent bindingComponent, View root, int localFieldCount) {
        ....
        if (USE_CHOREOGRAPHER) {
            mChoreographer = Choreographer.getInstance();
            // 屏幕刷新的回调
            mFrameCallback = new Choreographer.FrameCallback() {
                @Override
                public void doFrame(long frameTimeNanos) {
                    // 直接调用了run方法
                    mRebindRunnable.run();
                }
            };
        }
        ....
    }

   protected void requestRebind() {
        // mContainingBinding 没有做初始化
        if (mContainingBinding != null) {
            mContainingBinding.requestRebind();
        } else {
            final LifecycleOwner owner = this.mLifecycleOwner;
            if (owner != null) {
                Lifecycle.State state = owner.getLifecycle().getCurrentState();
                // 获取activity的生命周期,如果不是处于活跃状态(STATE>=STARTED)就忽略掉
                // 可以防止内存泄露
                if (!state.isAtLeast(Lifecycle.State.STARTED)) {
                    return; // wait until lifecycle owner is started
                }
            }
            ....
            if (USE_CHOREOGRAPHER) {
                // 监听下一帧的回调
                mChoreographer.postFrameCallback(mFrameCallback);
            } else {
                mUIThreadHandler.post(mRebindRunnable);
            }
        }
    }
}
mRebindRunnable 的实现如下
public abstract class ViewDataBinding extends BaseObservable implements ViewBinding {
    ...
    private final Runnable mRebindRunnable = new Runnable() {
        @Override
        public void run() {
            ....
            executePendingBindings();
        }
    };

    public void executePendingBindings() {
        if (mContainingBinding == null) {
            executeBindingsInternal();
        } else {
            mContainingBinding.executePendingBindings();
        }
    }

    private void executeBindingsInternal() {
        ....
        mRebindHalted = false;
        if (mRebindCallbacks != null) {
            mRebindCallbacks.notifyCallbacks(this, REBIND, null);
            // The onRebindListeners will change mPendingHalted
            if (mRebindHalted) {
                mRebindCallbacks.notifyCallbacks(this, HALTED, null);
            }
        }
        if (!mRebindHalted) {
            // 这里触发UI的刷新
            executeBindings();
            if (mRebindCallbacks != null) {
                // 发送notify
                mRebindCallbacks.notifyCallbacks(this, REBOUND, null);
            }
        }
        mIsExecutingPendingBindings = false;
    }
}
其内部通过Choreographer 监听新一帧的刷新,触发UI的刷新(调用setText方法),这样有一个好处是,我们可以在子线程调用set方法更新bean数据。
事件触发
说完UI的刷新,再看看我们在点击的时候,它又是怎么修改我们的值并更新ui的
我们再看看VideoBean类的实现:
public class VideoBean extends BaseObservable {
    ....
    public void increaseScore(View view) {
        score++;
        notifyPropertyChanged(BR.score);
    }
}
它继承了BaseObservable,然后在increaseScore方法里面调用了notifyPropertyChanged方法,显然,这是基于观察者模式实现的。
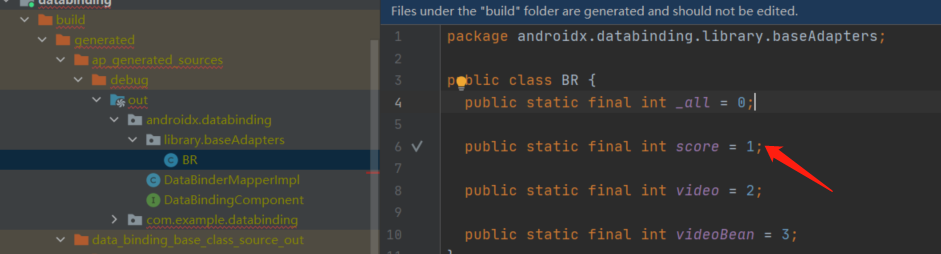
BR.score 值是多少呢?BR 的类路径如下
我们看看notifyPropertyChanged 的实现
public class BaseObservable implements Observable {
     private transient PropertyChangeRegistry mCallbacks;
     ...
     public void notifyPropertyChanged(int fieldId) {
        synchronized (this) {
            if (mCallbacks == null) {
                return;
            }
        }
        // 这里的mCallbacks是CallbackRegistry类
        mCallbacks.notifyCallbacks(this, fieldId, null);
    }
}
往下看CallbackRegistry 的实现
public class CallbackRegistry<C, T, A> implements Cloneable {
    // 1、先调用该方法
     public synchronized void notifyCallbacks(T sender, int arg, A arg2) {
        mNotificationLevel++;
        // 调用内部的方法
        notifyRecurse(sender, arg, arg2);
        ...
    }
   // 2、调用该方法
   private void notifyRecurse(T sender, int arg, A arg2) {
        final int callbackCount = mCallbacks.size();
        // 这里的mRemainderRemoved为null,所以remainderIndex 为-1
        final int remainderIndex = mRemainderRemoved == null ? -1 : mRemainderRemoved.length - 1;
        // notify其他的callback
        notifyRemainder(sender, arg, arg2, remainderIndex);
        ....
    }
    // 3、接着调用该方法
    private void notifyRemainder(T sender, int arg, A arg2, int remainderIndex) {
        if (remainderIndex < 0) {
            notifyFirst64(sender, arg, arg2);
        }
        ....
    }
    // 4、调用该方法
    private void notifyFirst64(T sender, int arg, A arg2) {
        final int maxNotified = Math.min(Long.SIZE, mCallbacks.size());
        notifyCallbacks(sender, arg, arg2, 0, maxNotified, mFirst64Removed);
    }
    // 5、最后调用该方法
    private void notifyCallbacks(T sender, int arg, A arg2, final int startIndex,
            final int endIndex, final long bits) {
        long bitMask = 1;
        for (int i = startIndex; i < endIndex; i++) {
            if ((bits & bitMask) == 0) {
                // 调用mNotifier 的onNotifyCallback,到这里就暂时无法跟进了
                mNotifier.onNotifyCallback(mCallbacks.get(i), sender, arg, arg2);
            }
            bitMask <<= 1;
        }
    }
}
mNotifier 是在构造函数处赋值的
public class CallbackRegistry<C, T, A> implements Cloneable {
    private final NotifierCallback<C, T, A> mNotifier;
    public CallbackRegistry(NotifierCallback<C, T, A> notifier) {
        mNotifier = notifier;
    }
    ....
}
而将CallbackRegistry初始化的地方有四处,线索到这里就中断了。

还记得BaseObservable里的mCallbacks 变量吗。
public class BaseObservable implements Observable {
     private transient PropertyChangeRegistry mCallbacks;
     ....
}
PropertyChangeRegistry 是继承CallbackRegistry的
public class PropertyChangeRegistry extends
        CallbackRegistry<Observable.OnPropertyChangedCallback, Observable, Void> {

    private static final CallbackRegistry.NotifierCallback<Observable.OnPropertyChangedCallback, Observable, Void> NOTIFIER_CALLBACK = new CallbackRegistry.NotifierCallback<Observable.OnPropertyChangedCallback, Observable, Void>() {
        @Override
        public void onNotifyCallback(Observable.OnPropertyChangedCallback callback, Observable sender,
                int arg, Void notUsed) {
            // 上面的mNotifier.onNotifyCallback 调用了callback的onPropertyChanged方法
            callback.onPropertyChanged(sender, arg);
        }
    };

    public PropertyChangeRegistry() {
        // 把NOTIFIER_CALLBACK传给CallbackRegistry的构造函数,即给mNotifier赋值
        super(NOTIFIER_CALLBACK);
    }
}
而callback是CallbackRegistry内部的一个list成员元素,这里的泛型C即Observable.OnPropertyChangedCallback
public class CallbackRegistry<C, T, A> implements Cloneable {
    private List<C> mCallbacks = new ArrayList<C>();
    ....
}
问题又来到,mCallbacks 是怎么初始化的?貌似我们遗漏了一些东西
再次回到ActivityMainBindingImpl
public class ActivityMainBindingImpl extends ActivityMainBinding  {
    ....
    public void setVideo(@Nullable com.example.databinding.VideoBean Video) {
        updateRegistration(0, Video);
        this.mVideo = Video;
        synchronized(this) {
            mDirtyFlags |= 0x1L;
        }
        notifyPropertyChanged(BR.video);
        super.requestRebind();
    }
}
在设置VideoBean的方法里面,有一个updateRegistration的方法,跟进去看看
public abstract class ViewDataBinding ...{
    private static final CreateWeakListener CREATE_PROPERTY_LISTENER = new CreateWeakListener() {
        @Override
        public WeakListener create(ViewDataBinding viewDataBinding, int localFieldId) {
            return new WeakPropertyListener(viewDataBinding, localFieldId).getListener();
        }
    };
    protected boolean updateRegistration(int localFieldId, Observable observable) {
        return updateRegistration(localFieldId, observable, CREATE_PROPERTY_LISTENER);
    }
    // 这里的listenerCreator参数即CREATE_PROPERTY_LISTENER
    private boolean updateRegistration(int localFieldId, Object observable,
            CreateWeakListener listenerCreator) {
        WeakListener listener = mLocalFieldObservers[localFieldId];
        if (listener == null) {
            registerTo(localFieldId, observable, listenerCreator);
            return true;
        }
        ....
        return true;
    }

    protected void registerTo(int localFieldId, Object observable,
            CreateWeakListener listenerCreator) {
        WeakListener listener = mLocalFieldObservers[localFieldId];
        if (listener == null) {
            // 这里调用CREATE_PROPERTY_LISTENER创建一个WeakPropertyListener
            listener = listenerCreator.create(this, localFieldId);
            mLocalFieldObservers[localFieldId] = listener;
            if (mLifecycleOwner != null) {
                // 设置lifecycle
                listener.setLifecycleOwner(mLifecycleOwner);
            }
        }
        // 将WeakPropertyListener与observable即VideoBean绑定
        listener.setTarget(observable);
    }
}
先看看WeakListener 的setTarget做了什么
private static class WeakListener<T> extends WeakReference<ViewDataBinding> {
     private final ObservableReference<T> mObservable;
     public WeakListener(ViewDataBinding binder, int localFieldId, ObservableReference<T> observable) {
         super(binder, sReferenceQueue);
         mLocalFieldId = localFieldId;
         mObservable = observable;
     }
     public void setTarget(T object) {
        unregister();
        mTarget = object;
        if (mTarget != null) {
            // 将我们的videoBean添加到mObservable
            mObservable.addListener(mTarget);
        }
    }
    ....
}
再看看WeakPropertyListener的构造函数
private static class WeakPropertyListener extends Observable.OnPropertyChangedCallback implements ObservableReference<Observable> {
       final WeakListener<Observable> mListener;
        public WeakPropertyListener(ViewDataBinding binder, int localFieldId) {
            mListener = new WeakListener<Observable>(binder, localFieldId, this);
        }
        // 这里的target即VideoBean
        @Override
        public void addListener(Observable target) {
            target.addOnPropertyChangedCallback(this);
        }
}
WeakPropertyListener 把自己作为Observable传给父类作为mObservable,最终调用了VideoBean的addOnPropertyChangedCallback。
即BaseObservable的addOnPropertyChangedCallback
public class BaseObservable implements Observable {
    private transient PropertyChangeRegistry mCallbacks;
    @Override
    public void addOnPropertyChangedCallback(@NonNull OnPropertyChangedCallback callback) {
        ...
        mCallbacks.add(callback);
    }
}
正是PropertyChangeRegistry的add将callback 添加到mCallbacks 里面
public class CallbackRegistry<C, T, A> implements Cloneable {
    public synchronized void add(C callback) {
        int index = mCallbacks.lastIndexOf(callback);
        if (index < 0 || isRemoved(index)) {
            mCallbacks.add(callback);
        }
    }
    ...
}
所以 mCallbacks 存储了WeakPropertyListener的实例,那就看看WeakPropertyListener的onPropertyChanged实现
private static class WeakPropertyListener ... {
     @Override
     public void onPropertyChanged(Observable sender, int propertyId) {
         ViewDataBinding binder = mListener.getBinder();
         if (binder == null) {
            return;
         }
         Observable obj = mListener.getTarget();
         if (obj != sender) {
            return; // notification from the wrong object?
         }
         binder.handleFieldChange(mListener.mLocalFieldId, sender, propertyId);
     }
    ...
}
最后通知到ViewDataBinding 刷新UI
public abstract class ViewDataBinding ... {
    ...
    private void handleFieldChange(int mLocalFieldId, Object object, int fieldId) {
        // 通知指定的属性变化
        boolean result = onFieldChange(mLocalFieldId, object, fieldId);
        if (result) {
            // 属性有刷新,就更新UI
            requestRebind();
        }
    }
}
关于无法触发刷新UI
有意思的是,如果fieldId 传的不对,还不会刷新UI了
且看onFieldChange 的实现
public class ActivityMainBindingImpl extends ActivityMainBinding  {
   ....
   @Override
    protected boolean onFieldChange(int localFieldId, Object object, int fieldId) {
        switch (localFieldId) {
            case 0 :
                return onChangeVideo((com.example.databinding.VideoBean) object, fieldId);
        }
        return false;
    }
    // 关键实现,判断是否更新成功
    // 这里只响应BR._all和BR.score
    private boolean onChangeVideo(com.example.databinding.VideoBean Video, int fieldId) {
        if (fieldId == BR._all) {
            synchronized(this) {
                    mDirtyFlags |= 0x1L;
            }
            return true;
        }
        else if (fieldId == BR.score) {
            synchronized(this) {
                    mDirtyFlags |= 0x2L;
            }
            return true;
        }
        return false;
    }

}
也就是说,如果我们在VideoBean调用notifyPropertyChanged的时候,如果传的是其他值,比如BR.video,就不会触发UI的刷新!!!
public class VideoBean extends BaseObservable {
    public void increaseScore(View view) {
        score++;
        // 传BR.video,将不会触发UI的刷新
        notifyPropertyChanged(BR.video);
    }
}
为什么这么设计呢?
还记得Bindable 注解吗,这个就是Bindable 注解的含义所在。
后记
viewBinding,DatatBinding与编译时注解有一点点类似,都是在编译的时候生成对应的模板代码,通过这种方式让我们免去写过多findViewById,和setText这种代码,同时也能帮我们解决异步更新ui的问题。但DatatBinding这种实现要依赖于Android Studio去实现模板代码。
用DataBinding很容易的实现数据的双向绑定,但是里面还是有一定的学习成本,而且不方便debug,各取所需吧。
——Weiwq 于 2021.10 广州