“你真的会用git?“
1、git 入门
配置git信息
$ git config --global user.name "name" //. 设置用户名
$ git config --global user.email name@example.com //设置邮箱
$ git config --list // 查看所有git的config信息
$ git config user.name // 查看name信息,格式如:git config <key>
$ git init // 初始化git仓库
// 以下有三种方式可以获取对应功能的help,比较有用
$ git help <verb> // 比如获取config的 help: git help config
$ git <verb> --help
$ man git-<verb>
这些配置最终会写到window平台的C:\Users\用户名\.gitconfig 或者mac平台的 ~/.gitconfig 文件中
[user]
	name = name
	email = name@example.com
....
基本命令
$ git add $filePath // 将文件添加到git管控
$ git commit -m 'initial project version' // 提交修改信息
$ git commit --amend // 修改当前最后一次commit的信息
$ git commit --amend --no-edit // 只更新修改内容,不修改提交commit信息
$ git clone https://github.com/xxx // 克隆仓库
$ git status //查看修改文件的状态
$ git diff // 查看未暂存的详细修改内容
$ git reset <filePath> // 将已经add的文件移除commit 列表
$ git stash // 将修改暂存到本地
$ git stash list // 获取暂存列表
$ git stash pop // 恢复上次暂存修改
$ git stash pop stash@{0} // 移除暂存栈顶
$ git stash clear // 将stash list 清空
但是如果我们需要指定的commit信息怎么办呢?
2、git log 常用命令
2.1、log命令
基本命令
$ git log // 查看所有commit信息
$ git shortlog // 查看简略的log
$ git log --oneline --no-merges tagA ^tagB // 查看tagA tagB之间的log信息
$ git log  --no-merges  tag1..   //在tag1后面加“..”表示获取该tag之后的commit信息
$ git log master..experiment // 查看 experiment 与master的差异,即在 experiment 分支中而不在 master 分支中的提交
$ git log origin/master..HEAD // 查看当前分支的提交与远程的差异(尚未提交的)
$ git log refA refB ^refC // 所有被 refA 或 refB 包含的但是不被 refC 包含的提交(也可以用于两个分支的比较)
$ git log refA refB --not refC  // 所有被 refA 或 refB 包含的但是不被 refC 包含的提交(也可以用于两个分支的比较)
参数:–pretty
- oneline:将commit在一列显示
$ git log --pretty=oneline
ca82a6dff817ec66f44342007202690a93763949 changed the version number
085bb3bcb608e1e8451d4b2432f8ecbe6306e7e7 removed unnecessary test
a11bef06a3f659402fe7563abf99ad00de2209e6 first commit

$ git log --oneline // 等效--pretty=oneline
085bb3bcb608e1e8451d4b2432f8ecbe6306e7e7 removed unnecessary test
$ git reflog // 等效 git log --oneline
e6306e7e7  HEAD@{1}:  removed unnecessary test
$ git log -g // 查看 reflog 的详细commit信息
- format:输出指定commit信息
$ git log --pretty=format:"%h - %an, %ar : %s"
ca82a6d - Scott Chacon, 6 years ago : changed the version number
085bb3b - Scott Chacon, 6 years ago : removed unnecessary test
a11bef0 - Scott Chacon, 6 years ago : first commit
以下是format具体格式说明,为了方便查阅,这里写成两大列:
| 选项 | 说明 | 选项 | 说明 |
|---|---|---|---|
%H |
提交的完整哈希值 | %h |
提交的简写哈希值 |
%T |
树的完整哈希值 | %t |
树的简写哈希值 |
%P |
父提交的完整哈希值 | %p |
父提交的简写哈希值 |
%an |
作者名字 | %ae |
作者的电子邮件地址 |
%ad |
作者修订日期(可以用 –date=选项 来定制格式) | %ar |
作者修订日期,按多久以前的方式显示 |
%cn |
提交者的名字 | %ce |
提交者的电子邮件地址 |
%cd |
提交日期 | %cr |
提交日期(距今多长时间 |
%s |
提交说明 |
另外还有short,full 和 fuller,这里就不一一列举
**参数:–follow **
获取指定文件的修改历史,例如结合pretty 参数,打印xxx.java 文件的提交历史
$ git log --pretty=oneline --follow app/src/main/java/com/xxx.java
085bb3bcb608e1e8451d4b2432f8ecbe6306e7e7 removed unnecessary test
$  git log --pretty=format:"%cd %an %s"  --follow app/src/main/java/com/xxx.java // 打印历史的提交日期,作者 commit信息
参数:-S
获取指定字符串的修改记录,例如:
$ git log -S function_name --follow app/src/main/java/com/xxxx.java // 在文件中找出关于function_name的提交
参数:–decorate
查看各分支所指的对象(TAG之间的commit)
$ git log --oneline --decorate
f30ab (HEAD -> master, testing) add feature #32 - ability to add new formats to the central interface
34ac2 Fixed bug #1328 - stack overflow under certain conditions
98ca9 The initial commit of my project
查看分支历史,指向情况
$ git log --oneline --decorate --graph --all
* c2b9e (HEAD, master) made other changes
| * 87ab2 (testing) made a change
|/
* f30ab add feature #32 - ability to add new formats to the
其他参数
| 参数 | 说明 |
|---|---|
-<n> |
仅显示最近的 n 条提交。如:git log -2 |
--since, --after |
仅显示指定时间之后的提交。如:git log –after 2020-05-23 |
--until, --before |
仅显示指定时间之前的提交。如: git log –before 2020-05-23 |
--author |
仅显示作者匹配指定字符串的提交。如:git log –author=’demo’ |
--committer |
仅显示提交者匹配指定字符串的提交。如: git log –committer=’demo’ |
--grep |
仅显示提交说明中包含指定字符串的提交。如:git log –grep ‘fix’ |
| –no-merges | 去掉合并提交,如:git log –no-merges |
2.2、show 命令
show参数主用用于查看指定commit的信息,常常与log命令搭配使用,比如查看指定commit详细修改
$ git show 98a0092e4c9a0329465b6ac113c2ddf04eb0695c
或者查看该commit 修改了哪些文件
$ git show 98a0092e4c9a0329465b6ac113c2ddf04eb0695c --name-only
可以查看该commit下指定文件的修改,比如查看Activity.java的修改内容:
$ git show 98a0092e4c9a0329465b6ac113c2ddf04eb0695c Activity.java
3、git远程仓库
仓库路径
// 查看远程仓库路径
$ git remote -v
origin	https://github.com/schacon/ticgit (fetch)
origin	https://github.com/schacon/ticgit (push)
// 添加远程仓库
$ git remote add origin https://github.com/paulboone/ticgit   //origin 用于替代后面的URL(即git服务器路径)
同步远程仓库
$ git fetch <remote> // 拉取远程所有数据和分支
$ git push origin master // 将本地master推送到远程仓库
$ git push origin master -f // 强制将本地master推送到远程仓库,并覆盖远程master
$ git push origin master:new_branch // 将本地master推送到远程新的new_branch分支
$ git remote prune origin  // 同步远程仓库分支
$ git branch --merged  // 查看哪些分支已经合并到当前分支,同理 `git branch --no-merged` 是查看未合并的分支
$ git branch --no-merged master // 查看哪些分支没有合并到指定分支,同理 `--merged `
重命名远程仓库
// 重命名远程仓库
$ git remote rename origin origin1
$ git remote
origin1
// 删除远程仓库
$ git remote remove origin1
分支管理
$ git branch // 查看本地仓库所有分支
$ git branch --remote //. 查看远程仓库所有分支
$ git checkout -b new_branch // 创建新的分支,并切到该分支上
$ git branch -d new_branch // 删除new_branch 分支
$ git checkout new_branch  // 切换到new_branch 分支

$ git push <remote> <branch> // 将当前分支推送到远程branch分支
$ git push <remote> <branch>:<branch1> // 将本地branch 推送到远程branch1
$ git checkout -b <branch> <remote>/<branch>  // 跟踪远程branch,并将本地分支切换到该branch

$ git push origin --delete serverfix  // 删除远程serverfix分支
$ git log featureA..origin/featureA  // 查看 featureA 与 远程featureA的差异(也可以查看其他远程分支)
$ git diff --stat master origin/master // 查看文件改动
打标签
$ git tag // 获取tag list
$ git tag -l "v1.8.5*" // 列举 1.8.5 系列的tag
$ git tag -a <tagname> -m "my version 1.4" // 打tag,并制定comment 信息。其中'-a' 是tag版本;'-m' 是tag 信息,可以不指定
$ git show <tagname> // 查看tag 版本的信息
$ git push origin <tagname> // 将tag  v1.4同步到远程分支
$ git push origin --tags //将全部的tag提交到远程分支
$ git tag -d <tagname> // 删除指定 tag
别名
如果不想每次都输入完整的命令,可以通过 git config 设置别名,比如:
$ git config --global alias.co checkout
$ git config --global alias.br branch
$ git config --global alias.ci commit // git commit 对应 git ci
$ git config --global alias.unstage 'reset HEAD --' // git reset HEAD 对应git unstage
$ git merge iss53 // 将 iss53  分支合并到当前分支
$ git mergetool  // 启动图形化的合并工具
在执行 git commit 的时候,就可以直接输入 git ci
SSH公钥
在Mac上 ,默认情况下,用户的 SSH 密钥存储在其 ~/.ssh 目录下,带pub扩展名的就是公钥
$ cd ~/.ssh
$ ls
id_rsa      id_rsa.pub  known_hosts
如果没有,就新建一个
$ ssh-keygen -o
Generating public/private rsa key pair.
Enter file in which to save the key (/home/schacon/.ssh/id_rsa):
Created directory '/home/schacon/.ssh'.
Enter passphrase (empty for no passphrase):
Enter same passphrase again:
Your identification has been saved in /home/schacon/.ssh/id_rsa.
Your public key has been saved in /home/schacon/.ssh/id_rsa.pub.
The key fingerprint is:
d0:82:24:8e:d7:f1:bb:9b:33:53:96:93:49:da:9b:e3 schacon@mylaptop.local
首先 ssh-keygen 会确认密钥的存储位置(默认是 .ssh/id_rsa),然后它会要求你输入两次密钥口令。 如果你不想在使用密钥时输入口令,将其留空即可。 然而,如果你使用了密码,那么请确保添加了 -o 选项,它会以比默认格式更能抗暴力破解的格式保存私钥。 你也可以用 ssh-agent 工具来避免每次都要输入密码。
或者使用如下可以指定ssh生成的名字
ssh-keygen -t rsa -C “你的邮箱或者名字”
4、变基(rebase)
rebase 方式与merge类似,都可以用于分支合并,区别就是rebase可以保持合并后的commit信息整洁,假如现在有两个分支master 和 experiment,公共提交是c2,如图所示:
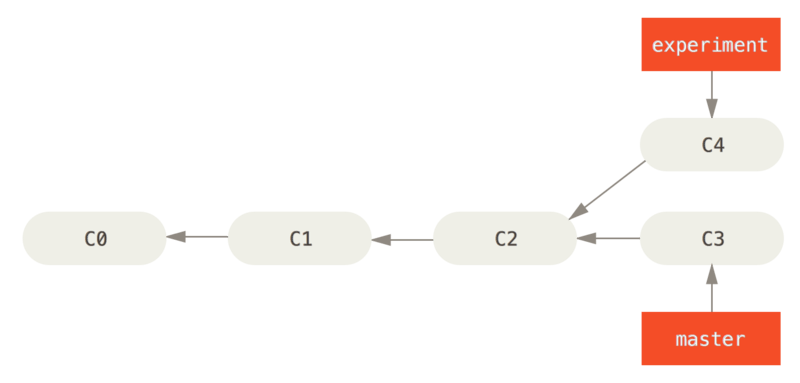
先切换到experiment分支,然后执行rebase
$ git checkout experiment
$ git rebase master
First, rewinding head to replay your work on top of it...
Applying: added staged command
// 重新切回到master
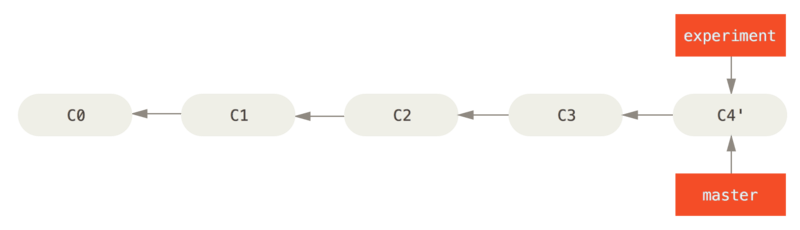
$ git checkout master
$ git merge experiment
最终merge结果如下图所示,就好像提交历史一直是串行的一样
更多见 rebase命令
修改历史
可以通过git stash 命令将当前修改项暂存,如果需要修改最近一次commit信息,就可以通过如下命令:
$ git commit --amend  // 进入编辑页面
// 或者
$ git commit --amend --no-edit // 无编辑的提交
如果需要修改最近的3个提交,可以通过rebase 的方式,如下
$ git rebase -i HEAD~3
然后会进入编辑框,编辑内容如下,需要注意下面的commit id是反的,最下的a5f4a0d 是最新的提交。
pick f7f3f6d changed my name a bit
pick 310154e updated README formatting and added blame
pick a5f4a0d added cat-file

# Rebase 710f0f8..a5f4a0d onto 710f0f8
#
# Commands:
# p, pick <commit> = use commit
# r, reword <commit> = use commit, but edit the commit message
# e, edit <commit> = use commit, but stop for amending
# s, squash <commit> = use commit, but meld into previous commit
# f, fixup <commit> = like "squash", but discard this commit's log message
# x, exec <command> = run command (the rest of the line) using shell
# b, break = stop here (continue rebase later with 'git rebase --continue')
# d, drop <commit> = remove commit
# l, label <label> = label current HEAD with a name
# t, reset <label> = reset HEAD to a label
# m, merge [-C <commit> | -c <commit>] <label> [# <oneline>]
# .       create a merge commit using the original merge commit's
# .       message (or the oneline, if no original merge commit was
# .       specified). Use -c <commit> to reword the commit message.
 .....
其中,Commands 有列举支持的命令,如果需要修改第三次的提交changed my name a bit ,只需要做如下修改
edit f7f3f6d changed my name a bit
pick 310154e updated README formatting and added blame
pick a5f4a0d added cat-file
然后按 ESC->输入:wq -> 保存并退出后,会有如下提示
$ git rebase -i HEAD~3
Stopped at f7f3f6d... changed my name a bit
You can amend the commit now, with

       git commit --amend

Once you're satisfied with your changes, run

       git rebase --continue
现在HEAD指向了changed my name a bit 提交,可以按照提示进行修改
$ git commit --amend
保存后运行,该命令会自动将前两个commit信息提交。如果有多个edit,这个命令会重复这些步骤,直到全部edit完
$ git rebase --continue
如果需要放弃当前的编辑,可以使用abort命令
$ git rebase --abort // 放弃当前的修改
revert
git revert 是本质是git cherry-pick 的逆向操作,可以撤销之前的提交,例如
$ git revert {commit_id}
重新排序
如果需要移除某个修改,或者修改commit顺序,可以通过如下步骤:
pick f7f3f6d changed my name a bit
pick 310154e updated README formatting and added blame
pick a5f4a0d added cat-file
修改为:
pick 310154e updated README formatting and added blame
pick f7f3f6d changed my name a bit
压缩提交
如果指定为 squash ,git 会把这些commit修改合并提交信息在一起,如果需要合并多个提交,可以这样:
pick f7f3f6d changed my name a bit
squash 310154e updated README formatting and added blame
squash a5f4a0d added cat-file
在保存完commit信息 的时候,就拥有一个包含3个commit的提交
5、git工具
git 搜索
可以通过-n 或者 --line-number 查找 工作目录下的指定字符串,输出的内容包含 “文件+行号+查找内容”
$ git grep -n gmtime_r
compat/gmtime.c:3:#undef gmtime_r
compat/gmtime.c:8:      return git_gmtime_r(timep, &result);
-p 会将字符串的上下文打印出来
$ git grep -p gmtime_r
date.c=static int match_multi_number(timestamp_t num, char c, const char *date,
date.c:         if (gmtime_r(&now, &now_tm))
date.c=static int match_digit(const char *date, struct tm *tm, int *offset, int *tm_gmt)
date.c:         if (gmtime_r(&time, tm)) {
git 还提供了字段提交的搜索
$ git log -S ZLIB_BUF_MAX --oneline  // 搜索提交日志中有关 ZLIB_BUF_MAX 的提交
$ git log -G ZLIB_BUF_MAX --oneline  // 搜索提交日志中有关 ZLIB_BUF_MAX 的提交(更加精确)
重置工具
如果有如下的提交
f7f3f6d changed my name a bit
310154e updated README formatting and added blame
- git reset {commit}
需要重置f7f3f6d 的提交,使其处于修改状态,可以使用如下命令,使得HEAD指针指向310154e
$ git reset 310154e
或者使用soft指令,该指令会撤销上一次的提交,如果使用git commit 就可以完成新的提交
$ git reset --soft 310154e
- git reset –hard {commit}
该命令会直接销毁掉之前的提交,并且不会保留任何修改项,看起来像是移动了HEAD指针
$ git reset --hard 310154e
如果需要查看历史变动可以通过reflog 命令,该命令会保存修改历史的commit id,被销毁的commit可以通过该命令找回
$ git reflog
- reset指定文件
将指定commit的文件重置
$ git reset f7f3f6d -- demo.txt
合并
在合并中出现冲突,如果不想处理冲突,可以通过abort 参数撤销
$ git merge --abort
如果需要清除掉当前的修改项,重新来,可以用
$ git reset --hard HEAD
忽略掉空白的修改项
$ git merge -Xignore-space-change whitespace
如果需要git在merge的时候,直接选择一边,忽略掉另一个,可以传 -Xours`` 或者 -Xtheirs,比如合并mundo分支,并接受我们的修改
$ git merge -Xours mundo
Auto-merging hello.rb
Merge made by the 'recursive' strategy.。。。。。
git 文件日志
如果需要查看文件全部提交的日志,可以使用blame,其中的前缀 ^ 指出了该文件自第一次提交后从未修改的那些行。
$ git blame {fileName}
^1da177e4c3f4 (Linus Torvalds 2005-04-16 15:20:36 -0700 75)
066b7ed955808 (Michal Marek   2014-07-04 14:29:30 +0200 76) ifeq ($(KBUILD_VERBOSE),1)
066b7ed955808 (Michal Marek   2014-07-04 14:29:30 +0200 77)   quiet =
066b7ed955808 (Michal Marek   2014-07-04 14:29:30 +0200 78)   Q =
066b7ed955808 (Michal Marek   2014-07-04 14:29:30 +0200 79) else
066b7ed955808 (Michal Marek   2014-07-04 14:29:30 +0200 80)   quiet=quiet_
066b7ed955808 (Michal Marek   2014-07-04 14:29:30 +0200 81)   Q = @
066b7ed955808 (Michal Marek   2014-07-04 14:29:30 +0200 82) endif
二分查找bug 提交
在排查问题的时候,如果你不知道是哪里出现问题,可以使用 bisect 进行二分查询提交日志
$ git bisect start // 开启二分查询
$ git bisect bad // 告诉git当前所在的提交有问题
$ git bisect good v1.0 // 告诉 bisect 已知的最后一次正常状态是哪次提交
Bisecting: 6 revisions left to test after this
[ecb6e1bc347ccecc5f9350d878ce677feb13d3b2] error handling on repo
Git 发现在你标记为正常的提交(v1.0)和当前的错误版本之间有大约12次提交,于是 Git 检出中间的那个提交。 现在你可以执行测试,看看在这个提交下问题是不是还是存在。假设测试结果是没有问题的,你可以通过 git bisect good 来告诉 Git。
$ git bisect good
Bisecting: 3 revisions left to test after this
[b047b02ea83310a70fd603dc8cd7a6cd13d15c04] secure this thing
现在你在另一个提交上了,这个提交是刚刚那个测试通过的提交和有问题的提交的中点。 你再一次执行测试,发现这个提交下是有问题的,因此你可以通过 git bisect bad 告诉 Git:
$ git bisect bad
Bisecting: 1 revisions left to test after this
[f71ce38690acf49c1f3c9bea38e09d82a5ce6014] drop exceptions table
直到找到bug的提交根源
$ git bisect bad
506b55293888dae435b7ca84accf52f09040d451 is the first bad commit
当你完成这些操作之后,你应该执行 git bisect reset 重置你的 HEAD 指针到最开始的位置
$ git bisect reset
bisect 也可以进行自动化测试,但是需要明确返回值,这里就不做讨论。
子模块
git允许项目中包含多个子模块,可以通过submodule命令指定子模块,如下添加一个DbConnector的库
$ git submodule add https://github.com/chaconinc/DbConnector
Cloning into 'DbConnector'...
remote: Counting objects: 11, done.
remote: Compressing objects: 100% (10/10), done.
remote: Total 11 (delta 0), reused 11 (delta 0)
Unpacking objects: 100% (11/11), done.
Checking connectivity... done.
这个时候就会在主项目下新增一个DbConnector的目录
$ git status
On branch master
Your branch is up-to-date with 'origin/master'.
Changes to be committed:
  (use "git reset HEAD <file>..." to unstage)
	new file:   .gitmodules
	new file:   DbConnector
如果需要指定目录,可以在添加的时候,在命令后面加上不同的路径
执行git diff 会有类似的信息
$ git diff --cached DbConnector
diff --git a/DbConnector b/DbConnector
new file mode 160000
index 0000000..c3f01dc
--- /dev/null
+++ b/DbConnector
@@ -0,0 +1 @@
+Subproject commit c3f01dc8862123d317dd46284b05b6892c7b29bc
当你提交时,会看到类似下面的信息:
$ git commit -am 'added DbConnector module'
[master fb9093c] added DbConnector module
 2 files changed, 4 insertions(+)
 create mode 100644 .gitmodules
 create mode 160000 DbConnector
然后提交到远程分支
$ git push origin master
在clone 包含子模块的项目时候,默认会包含子模块的路径,但是其没有任何文件,需要进行初始化
$ git submodule init
Submodule 'DbConnector' (https://github.com/chaconinc/DbConnector) registered for path 'DbConnector'
$ git submodule update
Cloning into 'DbConnector'...
或者直接执行 git submodule update --init
也可以在初始化的时候,通过--recurse-submodules指定下载全部的子模块
$ git clone --recurse-submodules https://github.com/chaconinc/MainProject
更多见子模块
6、配置
git 配置
你可以在 $PREFIX/etc/gitconfig 中获取当前git的基础变量配置,也可以通过命令查支持的config
$ git config
配置你的名字和邮箱地址
$ git config --global user.name "John Doe"
$ git config --global user.email johndoe@example.com
获取git支持的配置选项
$ man git-config
可以使用 core.editor 配置默认的编辑器,如果没有设置,默认使用vi编辑
$ git config --global core.editor emacs // 配置使用emacs 作为编辑器
commit模版
你可以指定某个路径下的文本作为commit提交的模版,git在提交commit信息的时候,会以改内容作为初始化信息
例如有如下文本 ~/.gitmessage.txt
commit your message here

[feature][projectName]
然后只需要设置模版路径即可
$ git config --global commit.template ~/.gitmessage.txt
当你执行 git commit 的时候就会显示定制的模版内容
user.signingkey
如果需要创建经签署标签,那你可以把GPG签署密钥加到配置中
$ git config --global user.signingkey <gpg-key-id>
你每次运行 git tag 命令时,即可直接签署标签,而无需定义密钥:
$ git tag -s <tag-name>
help.autocorrect
如果打错了一条命令,git会猜测你的意图,如下
$ git chekcout master
git:'chekcout' 不是一个 git 命令。参见 'git --help'。

您指的是这个么?
  checkout
如果你把help.autocorrect 设置成 1,那么git会自动校正并执行
$ git chekcout master
警告:您运行一个不存在的 Git 命令 'chekcout'。继续执行假定您要要运行的
是 'checkout'
在 0.1 秒钟后自动运行...
0.1秒即1/10 秒,如果设置help.autocorrect 为50,那么你就会有5秒的时间响应
Window平台回车键
window与其他平台同步作业的时候,可能会遇到CRLF 问题,因为 Windows 使用回车(CR)和换行(LF)两个字符来结束一行,而 macOS 和 Linux 只使用换行(LF)一个字符。
Git 可以在你提交时自动地把回车和换行转换成换行,而在检出代码时把换行转换成回车和换行。 你可以用 core.autocrlf 来打开此项功能。 如果是在 Windows 系统上,把它设置成 true,这样在检出代码时,换行会被转换成回车和换行:
$ git config --global core.autocrlf true
如果你是 仅运行在 Windows 上的项目,可以设置 false 取消此功能,把回车保留在版本库中:
$ git config --global core.autocrlf false
——Weiwq 后记于 2020.07 广州